
Pruning
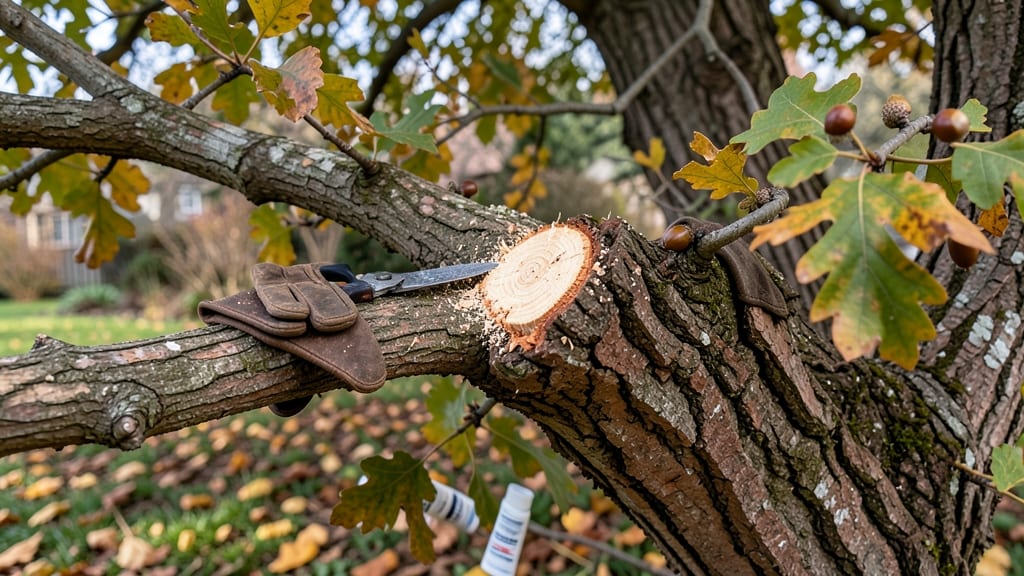
Cutting out a tree branch wrong can turn a simple trim into a long-term wound. ✂️ I’ve made that mistake—now I know the three-step cut that leaves a clean stub and promotes faster healing, not rot.
The key is timing, technique, and avoiding the "topping" trap that weakens trees for years.
You’ll need sharp tools (a pruning saw for branches over 2 inches thick, loppers for ½–2 inches, and bypass pruners for smaller cuts) plus a ladder or extension pole for safety. Work on dry days when branches aren’t wet—this prevents disease spread and makes cuts cleaner.
Most trees heal best when pruned in late winter or early spring, but fruit trees prefer summer trimming after harvest.
Start by making your first cut 1–2 feet out from the branch collar (that swollen area where the branch meets the trunk). Then cut just outside the branch collar to remove the weight.
For large branches, a third cut finishes the job—this prevents tearing. Seal wounds only if the tree is diseased; otherwise, let it heal naturally with the right cut.
Watch for signs of stress like oozing sap or fungal growth. If you’re unsure about a branch’s size or location, call an arborist—some cuts (like those near the trunk’s center) can kill the tree if done wrong. Your goal is a stronger, not just prettier, tree.
📚 In This Guide
- What you need
- Instructions
- Tips and common mistakes
- Wrapping up and next steps
What you need
- ● Pruning Shears or Hand Pruners: Sharp, bypass-style shears (16-20" blade length) for cuts under ½ inch in diameter.
- ● Loppers: Long-handled (24-30") for branches ½–2 inches thick.
- ● Pruning Saw: Curved-tooth saw for branches 2+ inches in diameter (8–12" blade length).
- ● Rubbing Alcohol or Bleach: 70% isopropyl alcohol or diluted bleach (1 part bleach to 10 parts water) for sterilizing tools.
- ○ Tree Wound Dressing (Optional but Recommended): Pruning sealant or tree paint (for cuts larger than 2 inches).
- ● Safety Gear: Work gloves (cut-resistant, like mechanics’ gloves)
- ● Safety goggles
- ● Ear protection (if using a chainsaw)
- ● Long sleeves/pants (to protect from scratches)
- ● Measuring Tape or Ruler: For assessing branch diameter and cut angles.
- ● Ladder or Extension Pole: Sturdy, non-slip ladder for high branches (or a pole saw for tall trees).
- ● Disposable Bags or Bin: For collecting debris (5–10 gallon capacity).
- ● Chainsaw: For large branches (3+ inches) or professional-grade work (with a clean, sharp chain).
- ● Extension Cord: If using power tools (ensure it’s rated for outdoor use).
- ● Pruning Rope or Zip Line: For lowering heavy branches safely.
- ● Tree Bandage or Wound Pruning Paste: Natural alternatives like bee’s wax or horticultural tape for sealing wounds.
- ● Notepad & Pen: To sketch a pruning plan or mark branches for removal.
Precision trimming for clean wounds and stronger growth
Here's how to make clean, healing cuts that boost your tree's health and prevent disease.
✂️ Step 1: Identify the Right Cutting Point
Start by locating the branch collar—the swollen area where the branch meets the trunk. This is your guide for making a clean cut. Never cut flush with the trunk, as this removes the tree's natural healing tissue. Instead, look for the branch bark ridge, the line that separates the branch from the trunk.
Use a sharp pruning saw or loppers to make your first cut about 1/4 inch outside the branch bark ridge. This creates a small notch that prevents the branch from tearing when you make the final cut. If the branch is small enough, you can skip this step and go straight to the final cut.
✂️ Step 2: Make the Final Cut to Remove the Branch
Stand on the opposite side of the first cut and make your final cut just outside the branch collar. Angle the cut slightly downward, following the natural slope of the branch. This ensures water runs off the wound instead of pooling and causing rot. The cut should be smooth—if it's jagged, your tool is dull and needs sharpening.
Step back and admire your work. A proper cut leaves a clean, angled surface that heals faster than a messy, uneven wound. If you're working with a large branch, you might need to make a third cut to remove the remaining stub, but only if it's larger than 1/4 inch.
🌿 Step 3: Smooth the Wound for Faster Healing
After removing the branch, inspect the wound for any rough edges or torn bark. Use a pruning saw or sharp knife to smooth out any jagged areas, but avoid removing too much tissue. The goal is to create a clean, rounded shape that encourages the tree to seal the wound naturally.
Leave the branch collar intact—this is the tree's built-in protection against decay. Over time, the tree will grow new tissue over the wound, but smoothing the edges now helps speed up the process. Avoid applying wound dressings, as they trap moisture and can slow healing.
☀️ Step 4: Monitor the Tree for Signs of Stress or Infection
In the weeks following your pruning, keep an eye on the tree for any signs of stress, such as wilting leaves or unusual discoloration. A healthy tree will start sealing the wound within a few weeks, but if you notice oozing sap, fungal growth, or dead branches nearby, take action immediately.
If the wound doesn’t heal properly or shows signs of infection, prune out any additional dead or diseased branches. Water the tree deeply but avoid overwatering, as soggy soil can encourage root rot. Most trees recover well from proper pruning, but monitoring ensures you catch any issues early.
Tips & tricks for precision tree branch trimming
These pro techniques will help you make cleaner cuts that heal faster and keep your tree thriving.
Tool Sharpness is Non-Negotiable: A dull saw or loppers will tear bark and create jagged wounds that heal poorly. Before you start, test your tools on a scrap piece of wood—if they struggle to cut cleanly, sharpen them immediately. I've seen too many pruning jobs ruined by dull blades that create ragged edges the tree can't properly seal.
Branch Collar Preservation: In Step 1, resist the urge to cut flush with the trunk—this removes the branch collar, the tree's natural healing tissue. Instead, make your first cut just outside the branch bark ridge (that 1/4-inch guideline is crucial). The collar acts like a scab for the tree, protecting against decay and promoting faster wound closure. I learned this the hard way after watching a pruned oak develop rot where I'd cut too close.
Angle Matters for Water Flow: When making your final cut in Step 2, angle it slightly downward following the branch's natural slope. This simple adjustment ensures rainwater runs off the wound instead of pooling in the cut, which would otherwise create a perfect breeding ground for bacteria and fungi. Think of it like creating a roof over the wound—nature will thank you with faster healing.
Season Timing for Optimal Healing: While not mentioned in the instructions, timing matters—prune during late winter or early spring when trees are dormant but about to enter active growth. This gives the tree maximum time to heal before summer stress. Avoid pruning during extreme heat or cold, as these conditions slow the healing process significantly.
Pro Tips for Tree Branch Cut Out
- These pro techniques will help you make cleaner cuts that heal faster and keep your tree thriving.
- Tool Sharpness is Non-Negotiable: A dull saw or loppers will tear bark and create jagged wounds that heal poorly. Bef...
- Branch Collar Preservation: In Step 1, resist the urge to cut flush with the trunk—this removes the branch collar, th...
Frequently asked questions
Got questions about cutting out tree branches like a pro?
You’re in the right place! Here are answers to the most common concerns—from safety to timing and everything in between.
What’s the best way to cut a tree branch without damaging the trunk?
Use the three-cut method to avoid bark tearing or trunk damage. First, make an undercut 12–18 inches from the trunk, then a top cut just outside the branch collar. Finally, make a back cut to drop the branch cleanly. Always cut at a 45-degree angle for proper healing.
When is the best time of year to trim tree branches?
The ideal time depends on your tree type. For deciduous trees, late winter or early spring (before buds swell) is best. Evergreens and fruit-bearing trees often need pruning right after harvest. Avoid heavy pruning in late summer—it stresses trees before winter. Pro tip: Check local guidelines, as some areas restrict pruning during nesting seasons!
Can I cut a tree branch myself, or should I hire a professional?
You can DIY small branches (under 3 inches thick) with the right tools and technique. For larger branches, overhanging limbs, or trees near power lines, hire an arborist. Professionals ensure safety, proper healing, and long-term tree health. Warning: Never use a ladder for branches too heavy to handle—falling branches can cause serious injury!
How do I know if a tree branch cut is healing correctly?
A healthy cut will show new growth at the branch collar (the swollen area where the branch meets the trunk) within a year. The wound should not ooze sap indefinitely or develop fungal growth (like conks or mushrooms). If you see rot, cracks, or excessive ooze, consult an arborist—it might signal disease or improper pruning.
Are there alternatives to cutting a tree branch if it’s dangerous or too high?
Yes! If a branch is too high or unstable, consider:
- Topping (last resort): Only for hazard removal—it weakens trees long-term.
- Cabling/Bracing: Supports weak branches without cutting (best for large, valuable trees).
- Professional Removal: Arborists use ropes, harnesses, or cranes for safe extraction.
For dead or diseased branches, removal is often the safest option to prevent spread.
Wrapping up and next steps
Mastering the art of a tree branch cut out isn’t just about shaping your trees—it’s about nurturing their health and future growth. 🌿 With the right tools, techniques, and timing, you can create clean wounds that heal faster and promote stronger, more resilient branches.
Whether you’re tackling overgrowth or pruning for safety, precision makes all the difference!
Ready to take your pruning skills to the next level? Start small—practice on a single branch, refine your cuts, and gradually build confidence. Before you know it, your trees will thank you with lush, vibrant foliage and sturdy structure. Happy trimming! ✂️🌳